FileStork.net - An excellent tool that allows students to put files in your dropbox. This tool allows you to collect files from students without having to download them each via an email. This service is amazingly easy to use once you set it up. The files are stored so that students cannot see each others files and you can set it to only accept certain file types. The way that it works is first you must have dropbox account (Click here to sign up for dropbox first). If you already have one or don't have a lot of space consider creating a new account just for these student files. I did this as well to segregate my files from theirs. Once the files are in your dropbox you can edit and notes to them, but the students cannot access them. Read more and see screenshots about how to setup and use after the jump.
Account Signup.
1. You will want to be logged into your dropbox account first. Then navigate to the filestork.net website and click on get started.
2. Log into Dropbox if it still requests you to do so.
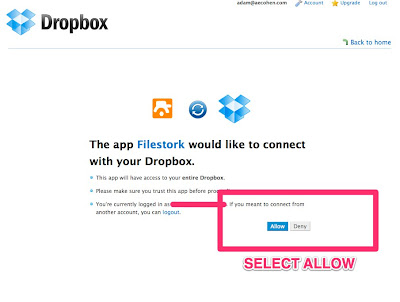
3. Allow FileStork access to your dropbox account
4. Select Standalone request, Complete the remainder of the fields. Request name is for you assign a name to this request. Description will allow you to include directions or other information about the files and type of files you are requesting. The Folder Name field will be what the folder will be named as in your dropbox account. If you want to separate files by creating different folders for each period consider naming them with the period # or class title. Next select the type of files you are accepting. I would strongly encourage you to never allow Executable file types unless you are asking students to produce executable code. These executable file types can be more dangerous for you and can install malicious software just by your attempt at opening them. Be cautious! If you are having students produce a paper or powerpoint Documents would be sufficient.
5. Create a password- I recommend creating a password for the folder to keep people that are not your students from adding files into your dropbox account. Also by setting a password you can stop students from dropping their files off by simply changing the password. That is perfect if you have a deadline for them to turn in their work and prevents student from turning it in after the time it is due. I also set it to have me notified when a file is added so I know when they are adding items to the folder. TIP: Make the password for the folder different than any other password you especially different than the one you use for the overall dropbox account.
6. Click View Details to get the short link that student will need.
7. Here you can find the link that you will provide students, don't forget to share the password with them or they will not be able to put files in the folder. Note that here you can click on the pencil in order to edit the request to maybe allow for additional file types, change the folder name or directions as well as modify the password.
8.This is what students see when they follow the link.
This is the only interaction the students have, limited but good if you are concerned about the integrity of their work being compromised by other students.
8. On the teachers side, log into your dropbox, there is a filestork folder. Under filestork you will find the files that student uploaded. Enjoy.


No comments:
Post a Comment